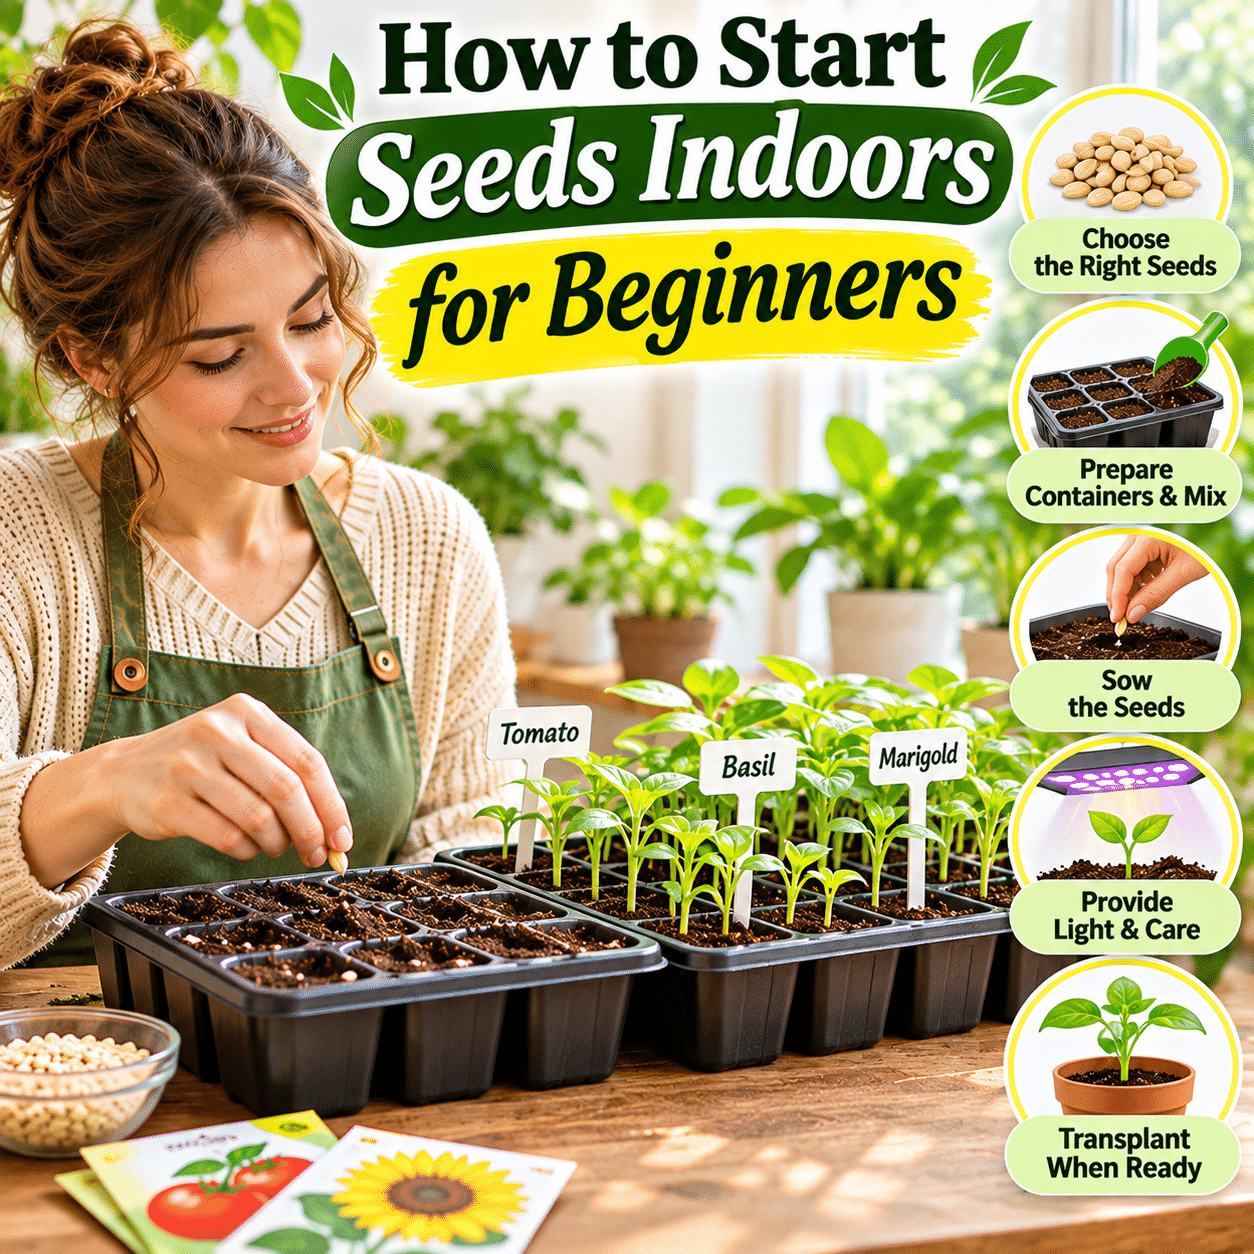
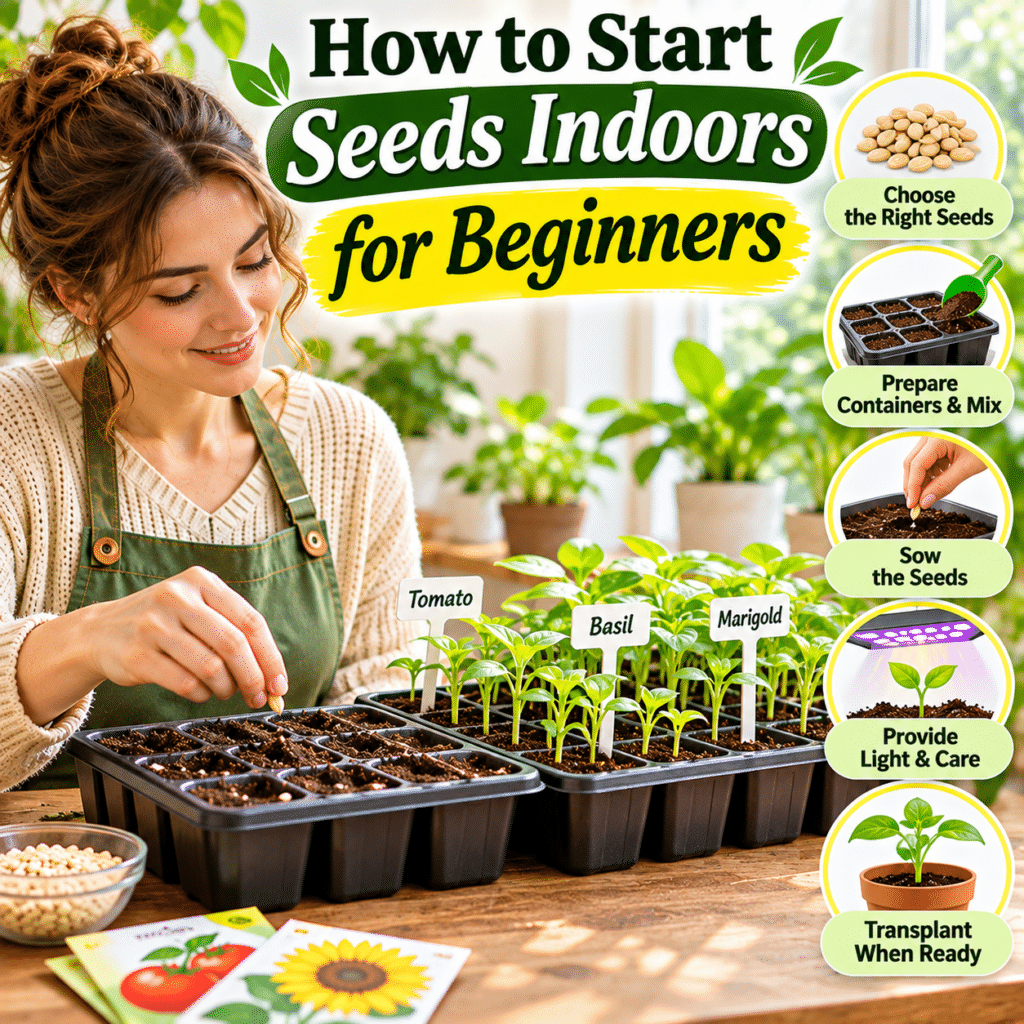
Starting seeds indoors is a rewarding way to grow plants from the very beginning of their life cycle. Instead of purchasing established seedlings, you can watch tiny seeds germinate, develop their first leaves, and gradually become healthy young plants ready for larger containers or outdoor gardens.
Indoor seed starting offers greater control over growing conditions, especially during the earliest stages of plant development. By managing moisture, temperature, light, and growing media, gardeners can create an environment that supports germination and early growth.
It also provides opportunities to explore different plant varieties, including vegetables, herbs, flowers, and ornamental plants that may not always be available as ready-grown seedlings.
For beginners, however, the process can seem complicated. Seed packets contain unfamiliar terms, different plants require different temperatures, and newly emerged seedlings may be sensitive to watering mistakes or inadequate lighting.
The good news is that successful seed starting does not require a large greenhouse or an elaborate collection of gardening equipment. A clean growing area, suitable containers, quality seed-starting mix, reliable light, and careful observation are enough to begin with many common plant varieties.
Understanding the basic stages of seed development helps prevent common problems such as poor germination, weak seedlings, excessive moisture, and transplant damage.
This guide explains how to choose suitable seeds, prepare an indoor growing area, sow seeds correctly, maintain healthy growing conditions, care for young seedlings, and gradually prepare plants for their next stage of growth.
Whether you want to grow fresh herbs on a windowsill, raise vegetables for a home garden, or experiment with flowering plants, indoor seed starting can become a practical and enjoyable gardening skill.
1. Understand What Starting Seeds Indoors Means
Starting seeds indoors involves sowing seeds in containers within a controlled environment rather than planting them directly into an outdoor garden.
The seeds germinate and begin growing while protected from some outdoor environmental challenges.
Indoor seed starting allows gardeners to manage important conditions such as:
- Growing medium.
- Moisture.
- Temperature.
- Light exposure.
- Air circulation.
- Container cleanliness.
- Seedling development.
Once seedlings become sufficiently established, they may be transplanted into larger indoor containers or gradually introduced to outdoor conditions.
Not every plant needs to be started indoors, but the method can be useful for many species.
2. Understand Why Gardeners Start Seeds Indoors
Indoor seed starting provides several practical advantages.
It can help gardeners begin growing plants before outdoor conditions become suitable.
It may also provide access to a wider selection of varieties than those commonly sold as established seedlings.
Additional benefits include:
- Greater control over early growing conditions.
- Opportunities to observe plant development.
- More flexibility in planning a garden.
- The ability to raise several plants in a compact area.
- Reduced exposure to some outdoor weather challenges.
- Opportunities to develop gardening skills.
However, indoor growing also requires suitable lighting, careful watering, and attention to transplant timing.
The method is most successful when its requirements match the gardener’s available space and resources.
3. Learn the Basic Stages of Seed Development
Understanding how seeds develop makes the process easier to manage.
Most commonly grown seed plants pass through several recognizable stages.
Seed hydration: The seed absorbs water, beginning processes that support germination.
Germination: Under suitable conditions, the embryo resumes growth and the first root emerges.
Emergence: The developing shoot reaches the surface of the growing medium.
Seed leaves: Cotyledons become visible and may help support early development.
True leaves: Leaves characteristic of the plant begin forming.
Seedling growth: Roots, stems, and foliage continue developing.
Transplant readiness: The young plant becomes sufficiently established for movement into another growing environment.
The timing of these stages varies widely among species.
4. Choose Beginner-Friendly Seeds
Some seeds germinate readily and produce vigorous seedlings under ordinary indoor conditions.
Others require specialized treatments, precise temperatures, or long germination periods.
For a first attempt, choose varieties known for relatively straightforward germination.
Possible options include:
- Basil.
- Lettuce.
- Tomatoes.
- Marigolds.
- Zinnias.
- Certain peppers.
- Some leafy greens.
- Selected annual flowers.
Ease of germination does not necessarily mean that the plant will thrive indefinitely indoors.
For example, tomatoes and peppers generally require strong light and adequate space as they grow.
Choose plants according to both their germination requirements and their intended growing location.
5. Understand Which Seeds Are Better Sown Directly Outdoors
Not every plant benefits from indoor seed starting.
Some species develop sensitive root systems or grow quickly enough that direct outdoor sowing is more practical.
Examples may include:
- Carrots.
- Radishes.
- Many beans.
- Peas.
- Some root vegetables.
- Certain fast-growing vines.
Some of these plants can still be started in containers under appropriate conditions, but transplanting may be more difficult.
Check the seed packet or a reliable species-specific growing guide.
When direct sowing is recommended, consider whether indoor starting offers a meaningful advantage.
6. Read the Seed Packet Carefully
A seed packet often contains important information about germination and early growth.
Look for:
- Botanical or common plant name.
- Recommended sowing depth.
- Germination temperature.
- Expected germination period.
- Light requirements.
- Plant spacing.
- Recommended sowing season.
- Transplanting guidance.
- Special treatments.
Some seeds require light for germination, while others germinate best when covered.
Certain species need a period of cold, soaking, scarification, or another pretreatment.
Follow species-specific instructions rather than assuming all seeds should be handled identically.
7. Choose Seeds From Reliable Sources
Seed quality influences germination success.
Purchase seeds from reputable suppliers that provide clear variety identification and growing instructions.
When evaluating seeds, consider:
- Appropriate variety for the growing climate.
- Packaging condition.
- Storage history when known.
- Seed age.
- Germination information.
- Suitability for indoor starting.
Older seeds may still germinate, but viability often declines over time.
The rate of decline depends on the species and storage conditions.
8. Understand Seed Viability
Seed viability refers to whether a seed remains capable of germinating.
Seeds are living biological structures, and their ability to germinate can decline with age.
Moisture, heat, and unsuitable storage conditions may accelerate deterioration.
Some species retain viability for several years under good conditions.
Others lose viability more quickly.
If using older seeds, a small germination test may help estimate whether they remain usable.
However, a successful test does not guarantee identical results under every growing condition.
9. Store Unused Seeds Properly
Seeds generally benefit from storage in cool, dry, stable conditions.
Keep them protected from excessive humidity, direct sunlight, and temperature fluctuations.
Use clearly labeled containers or packets.
Record the variety and relevant purchase or collection information.
For long-term storage, moisture control is particularly important.
Avoid exposing stored seeds to condensation when moving them between cold and warm environments.
Different species have different storage requirements, so specialized seeds may need additional care.
10. Decide When to Start Seeds Indoors
The ideal starting date depends on the plant and its intended destination.
For plants that will eventually grow outdoors, timing often relates to the local growing season.
In climates with frost, seed packets may recommend starting seeds a certain number of weeks before the expected last frost.
In tropical or frost-free climates, timing may depend more on rainfall, heat, humidity, and seasonal growing conditions.
Indoor-only plants may follow a different schedule.
Consider:
- Expected germination time.
- Seedling growth rate.
- Outdoor planting conditions.
- Available indoor growing space.
- Transplant readiness.
- Local climate.
Starting too early can produce oversized seedlings before suitable transplant conditions arrive.
11. Understand Local Growing Seasons
Growing seasons vary significantly around the world.
In temperate climates, temperature and frost dates often determine planting schedules.
In tropical climates, heavy rainfall, intense heat, or seasonal humidity may be more important.
In arid regions, extreme heat and water availability can influence planting decisions.
Do not rely on a planting calendar designed for a different climate.
Local horticultural resources, agricultural extension services, and experienced regional growers can provide useful guidance.
12. Choose a Suitable Indoor Growing Location
A successful seed-starting area should provide stable conditions and convenient access for daily care.
Possible locations include:
- A bright room.
- A dedicated plant shelf.
- A protected utility area.
- A home office corner.
- A table near suitable lighting.
- A small indoor growing station.
Consider whether the location provides enough space for containers, lights, watering equipment, and developing seedlings.
Avoid areas exposed to strong drafts, extreme temperatures, or frequent disturbance.
The growing area should also be easy to clean.
13. Understand the Importance of Light
Light becomes especially important once seedlings emerge.
Young plants need adequate illumination to support photosynthesis and healthy development.
Insufficient light can produce seedlings with long, weak stems.
This condition is often described as leggy growth.
A bright-looking room may not provide enough usable light, particularly when seedlings are positioned far from windows.
Many vegetable and flowering seedlings require stronger light than ordinary indoor room conditions provide.
14. Decide Whether to Use Natural Light or Grow Lights
Natural sunlight can support seedlings when exposure is sufficient.
However, windowsill conditions may vary with weather, season, window direction, and surrounding buildings.
Artificial grow lights provide more consistent control.
They are especially useful for:
- Seedlings requiring strong illumination.
- Rooms with limited natural light.
- Indoor shelves.
- Seasonal seed starting.
- Growing several trays together.
Choose lights designed for plant growth and follow the manufacturer’s instructions for distance, coverage, and operating duration.
Avoid assuming that ordinary decorative lighting provides sufficient illumination.
15. Understand Grow Light Positioning
The distance between a grow light and seedlings influences the amount of light reaching the foliage.
A light positioned too far away may provide insufficient illumination.
A light positioned too close may create excessive intensity or heat, depending on the fixture.
Different lighting systems have different output characteristics.
Follow the manufacturer’s recommendations and observe seedling response.
Adjust the fixture as seedlings grow.
Keep electrical equipment protected from watering spills.
16. Establish a Consistent Light Schedule
Seedlings generally benefit from a predictable daily light-and-dark cycle.
Many commonly grown seedlings perform well with an extended daily lighting period, but the appropriate duration depends on species and light intensity.
A timer can help maintain consistency.
Avoid leaving grow lights on continuously unless a specific growing protocol requires it.
Plants use dark periods for important physiological processes.
Follow species-specific guidance when available.
17. Understand Germination Temperature
Temperature influences the speed and success of germination.
Different seeds have different preferred temperature ranges.
Some cool-season crops germinate well under relatively mild conditions.
Warm-season crops may require warmer growing media.
Excessively low temperatures can delay germination.
Excessively high temperatures can reduce germination success or damage seeds.
Check the seed packet for recommended conditions.
The temperature of the growing medium may differ from the surrounding room temperature.
18. Consider Using a Seedling Heat Mat
A seedling heat mat can provide gentle bottom warmth when the growing environment is cooler than a seed’s preferred germination range.
It may be useful for certain warm-season crops.
However, additional heat is not necessary for every species.
Some seeds germinate better under cooler conditions.
If using a heat mat, choose equipment intended for horticultural use.
A compatible thermostat can help prevent excessive temperatures.
Follow the manufacturer’s safety instructions and keep electrical connections away from water.
19. Choose Suitable Seed-Starting Containers
Seeds can be started in several types of containers.
Common options include:
- Seed-starting trays.
- Individual nursery pots.
- Cell inserts.
- Biodegradable pots.
- Reusable propagation containers.
- Clean repurposed containers with suitable drainage.
The best option depends on seed size, root development, available space, and transplanting plans.
Small cells save space but may require earlier transplanting.
Larger containers provide more growing room but use more potting media.
20. Understand Why Drainage Matters
Seed-starting containers should allow excess water to escape.
Poor drainage can leave growing media excessively wet and reduce oxygen availability around developing roots.
For many common seeds, functional drainage holes are essential.
A tray beneath the containers can collect water during watering.
Empty excess water when appropriate.
Avoid allowing containers to remain in standing water unless using a carefully managed watering system.
21. Clean Reusable Containers
Cleanliness helps reduce the risk of introducing unwanted organisms into a seed-starting environment.
Before reusing containers:
- Remove old growing media.
- Wash away visible debris.
- Clean the container thoroughly.
- Disinfect when appropriate, particularly after previous disease problems.
- Rinse and dry according to the cleaning product’s instructions.
Use cleaning products safely and never mix incompatible chemicals.
Clean containers are especially helpful when raising delicate seedlings.
22. Choose a Quality Seed-Starting Mix
Seed-starting media should support moisture retention while allowing adequate aeration and drainage.
Many commercial seed-starting mixes are designed with fine particles that make it easier for small roots to develop.
Common ingredients may include:
- Coco coir.
- Peat-based materials.
- Perlite.
- Vermiculite.
- Other horticultural components.
The ideal mix depends on the species and growing method.
For many beginner projects, a reputable commercial seed-starting mix is a convenient choice.
23. Understand Why Garden Soil Is Often Unsuitable
Ordinary outdoor garden soil may be too dense for small indoor seed-starting containers.
It can also contain weed seeds, insects, or plant pathogens.
Fine soil particles may compact and reduce aeration.
A suitable container-growing medium generally provides more predictable moisture and drainage conditions.
If using a specialized soil-based formulation, follow reliable horticultural guidance.
24. Prepare the Growing Medium Before Sowing
Some dry seed-starting mixes are easier to use after being lightly moistened.
Add water gradually and mix until the medium becomes evenly damp.
Avoid creating a muddy or saturated mixture.
The goal is to provide moisture while preserving air spaces.
Break apart compressed clumps gently.
Fill containers without packing the growing medium excessively tightly.
25. Understand Proper Seed Sowing Depth
Sowing depth influences whether a seed can germinate and emerge successfully.
Seeds planted too deeply may struggle to reach the surface.
Seeds planted too shallowly may dry out or fail to establish properly.
Seed size can provide a rough indication of planting depth, but it is not a substitute for species-specific instructions.
Some very small seeds should be pressed onto the surface because they require light for germination.
Others should be covered with a measured layer of growing medium.
Always check the seed packet.
26. Understand Seeds That Need Light to Germinate
Some seeds require or benefit from light exposure during germination.
These seeds may need to remain on or very near the surface of the growing medium.
Covering them too deeply can reduce germination success.
Other seeds germinate effectively in darkness.
Requirements vary among species.
When a packet specifies surface sowing, gently press the seeds into contact with the moist medium without burying them unnecessarily.
27. Space Seeds Appropriately
Crowded seedlings can compete for light, moisture, nutrients, and growing space.
Dense growth can also reduce airflow.
In cell trays, sowing one or a few seeds per cell may be appropriate depending on seed size and expected germination.
For open trays, follow the recommended spacing.
Avoid scattering excessive numbers of seeds simply because they are small.
Thoughtful spacing makes later thinning and transplanting easier.
28. Label Every Seed Container
Seedlings from different species can look surprisingly similar during early development.
Labels help prevent confusion.
Record:
- Plant name.
- Variety.
- Sowing date.
- Special treatment when relevant.
- Other useful growing notes.
Use waterproof labels or a durable labeling method.
Accurate records are especially valuable when growing several varieties at the same time.
29. Water Newly Sown Seeds Carefully
Newly sown seeds require appropriate moisture to begin germination.
However, strong streams of water can displace small seeds or wash away growing medium.
Use gentle watering methods such as:
- A fine misting attachment.
- A watering can with a gentle rose.
- Carefully controlled bottom watering.
- A small watering tool for individual cells.
The objective is to moisten the growing medium without disturbing seed placement.
Avoid allowing the medium to become waterlogged.
30. Maintain Consistent Moisture During Germination
Many seeds need reasonably consistent moisture while germinating.
If the growing medium dries excessively after the seed has begun absorbing water, germination may be interrupted.
However, excessive moisture can reduce oxygen availability and encourage decay.
Check the medium regularly.
The surface should not automatically be kept saturated.
Adjust moisture according to seed requirements and growing conditions.
31. Understand Humidity Domes
Humidity domes or clear covers can reduce moisture loss from seed-starting trays.
They may help maintain a more consistent environment during germination.
However, covers can also trap excessive moisture and heat.
If using a dome:
- Monitor condensation.
- Follow the equipment instructions.
- Avoid overheating.
- Check moisture regularly.
- Provide ventilation when appropriate.
For many ordinary seedlings, the dome should be removed once emergence begins or as recommended for the species.
32. Avoid Excessive Condensation
Heavy condensation inside a covered seed tray may indicate high humidity and limited air exchange.
Although some condensation is normal, persistently saturated conditions can create problems.
Check whether the growing medium is excessively wet.
Provide ventilation when appropriate.
Avoid placing covered trays in intense direct sunlight where temperatures may rise rapidly.
The goal is suitable moisture, not maximum humidity.
33. Be Patient During Germination
Seeds do not all germinate at the same speed.
Some species emerge within a few days under suitable conditions.
Others may require several weeks or longer.
Germination time depends on:
- Species.
- Seed viability.
- Temperature.
- Moisture.
- Light requirements.
- Sowing depth.
- Dormancy characteristics.
Avoid digging up seeds repeatedly to check their progress.
Disturbing the growing medium can damage emerging roots.
34. Recognize the First Signs of Germination
The earliest visible sign of germination may be a small shoot emerging from the growing medium.
In many plants, seed leaves appear before true leaves.
These first leaves are called cotyledons.
They may look different from the mature plant’s foliage.
As the seedling develops, true leaves begin to emerge.
This is a useful stage for evaluating light, spacing, and general seedling health.
35. Move Emerging Seedlings Into Suitable Light
Once seedlings emerge, adequate light becomes essential.
If seedlings are grown under artificial lighting, ensure the light is positioned appropriately.
If using natural light, provide enough illumination without exposing delicate seedlings to sudden intense sunlight.
Insufficient light can cause weak, elongated growth.
Observe the seedlings daily during this stage because they may change rapidly.
36. Understand Leggy Seedlings
Leggy seedlings have unusually long, thin stems relative to their development.
They often stretch toward a light source.
Insufficient light is a common cause, although temperature and crowding can also contribute.
Possible improvements include:
- Providing stronger suitable light.
- Adjusting grow light distance.
- Reducing overcrowding.
- Maintaining appropriate temperatures.
- Avoiding unnecessary delays in transplanting.
Some species can be planted deeper during transplanting, but others should remain at their original growing depth.
Do not apply deep planting to every seedling.
37. Thin Seedlings When Necessary
When several seedlings emerge close together, thinning may be needed.
Thinning reduces competition and allows the remaining seedlings to develop more effectively.
For delicate seedlings, cutting unwanted stems near the growing medium surface may be safer than pulling them out.
Pulling can disturb neighboring roots.
Choose the healthiest seedlings based on their growth and condition.
Follow species-specific spacing recommendations.
38. Provide Gentle Air Circulation
Air circulation can help reduce stagnant conditions around seedlings.
Gentle airflow may also support stronger stem development in some plants.
However, strong drafts can dry growing media rapidly or damage delicate shoots.
If using a fan, position it to provide gentle movement rather than a concentrated stream.
Maintain appropriate temperature and humidity.
Good airflow works alongside proper watering and sanitation.
39. Understand Damping-Off Disease
Damping-off is a term used for seedling diseases caused by certain soilborne or water-associated pathogens.
Affected seedlings may collapse near the growing medium surface.
Some develop weakened, discolored stem bases.
Damping-off can spread rapidly under favorable conditions.
Risk-reduction practices include:
- Using clean containers.
- Choosing suitable growing media.
- Avoiding excessive moisture.
- Providing appropriate airflow.
- Preventing overcrowding.
- Maintaining suitable temperatures.
Once a seedling is severely affected, recovery is often unlikely.
Remove affected material carefully and review the growing conditions.
40. Know When Seedlings Need Additional Nutrients
Seeds contain stored resources that support early germination and development.
As seedlings grow, they eventually require additional nutrients.
Some commercial growing media already contain fertilizer.
Others contain little or no added nutrition.
The appropriate time to begin feeding depends on the plant, medium, and development stage.
For many seedlings, fertilization becomes relevant after true leaves appear and active growth begins.
Use products suitable for seedlings and follow label directions.
Excess fertilizer can damage tender roots.
Practical Step-by-Step Guide: How to Start Seeds Indoors
The following process provides a straightforward framework for beginners.
Step 1: Choose Your Seeds
Select beginner-friendly varieties suited to your growing conditions.
Read the seed packets to understand germination requirements.
Step 2: Plan Your Timing
Determine when the plants should be ready for transplanting or continued indoor growth.
Consider local growing seasons and expected seedling development.
Step 3: Prepare a Growing Area
Choose a clean location with suitable temperature and lighting.
Make sure the area is accessible for regular care.
Step 4: Gather Your Supplies
Prepare:
- Seeds.
- Seed-starting containers.
- Suitable growing medium.
- Watering equipment.
- Plant labels.
- A drainage tray.
- Appropriate lighting.
- Optional temperature-monitoring equipment.
Step 5: Clean the Containers
Wash reusable containers and remove old debris.
Disinfect when appropriate.
Confirm that drainage holes are functional.
Step 6: Moisten the Seed-Starting Mix
Add water gradually until the growing medium is evenly damp.
Avoid excessive saturation.
Step 7: Fill the Containers
Place the prepared mix into the seed trays or pots.
Settle it gently without compacting it excessively.
Step 8: Sow the Seeds
Follow the recommended depth and spacing for each species.
Surface-sow seeds that require light for germination.
Step 9: Label the Containers
Record the plant name, variety, and sowing date.
Use durable labels that remain readable when wet.
Step 10: Water Gently
Moisten the growing medium without washing seeds out of position.
Allow excess water to drain.
Step 11: Provide Suitable Germination Conditions
Maintain the temperature and moisture recommended for the seeds.
Use a humidity cover only when appropriate.
Step 12: Monitor Daily
Check moisture and temperature.
Watch for emerging shoots.
Avoid unnecessary disturbance.
Step 13: Provide Adequate Light After Emergence
Position seedlings under suitable grow lights or in an appropriately bright location.
Adjust lighting as plants grow.
Step 14: Remove Covers When Appropriate
Remove or ventilate humidity domes according to seedling development and species requirements.
Avoid maintaining unnecessarily saturated conditions.
Step 15: Thin Crowded Seedlings
Remove excess seedlings carefully.
Provide adequate space for healthy growth.
Step 16: Continue Gentle Watering
Check moisture regularly.
Water when needed without keeping the medium excessively wet.
Step 17: Begin Appropriate Feeding
Once seedlings reach the suitable developmental stage, provide nutrients if the growing medium does not already supply enough.
Follow fertilizer instructions carefully.
Step 18: Monitor Root Development
Check whether seedlings are becoming crowded in their containers.
Avoid allowing roots to become severely restricted.
Step 19: Transplant When Ready
Move seedlings into larger containers or their intended growing location when they are sufficiently established.
Handle roots and stems gently.
Step 20: Harden Off Outdoor-Bound Seedlings
Before moving indoor-grown seedlings permanently outdoors, gradually introduce them to outdoor conditions.
Protect them from intense sunlight, wind, and temperature extremes during the transition.
Understanding When Seedlings Are Ready for Transplanting
Seedlings should not be transplanted simply because a fixed number of days has passed.
Readiness depends on the species, root development, plant size, and destination.
Possible indicators include:
- Several healthy true leaves.
- A root system that holds the growing medium together.
- Strong enough stems for careful handling.
- Adequate overall growth.
- Suitable conditions in the destination container or garden.
Avoid waiting until seedlings become severely root-bound.
At the same time, transplanting extremely young seedlings can damage delicate roots.
The best timing balances sufficient development with manageable root disturbance.
How to Harden Off Seedlings Before Outdoor Planting
Hardening off is the gradual process of helping indoor-grown seedlings adjust to outdoor conditions.
Indoor environments generally provide more protection from wind, direct sunlight, and temperature changes.
Moving seedlings directly into intense outdoor conditions can cause stress or damage.
A gradual transition may involve:
- Begin with a short period in a sheltered outdoor location.
- Protect seedlings from strong sunlight and wind.
- Increase outdoor exposure gradually.
- Introduce brighter light according to the plant’s tolerance.
- Monitor moisture because outdoor conditions may increase drying.
- Avoid exposure to temperatures unsuitable for the species.
- Move seedlings to their permanent location when they are adequately acclimated.
Many gardeners complete this process over approximately one to two weeks, but the duration varies with species and weather.
In very hot climates, midday sunlight may remain too intense for some seedlings even after acclimation.
Use plant response and local conditions to guide the process.
Practical Indoor Seed-Starting Checklist
Use this checklist to organize your first seed-starting project.
Planning
- I selected seeds suitable for beginners.
- I checked the germination requirements.
- I understand the plant’s intended growing location.
- I considered local climate and planting seasons.
- I planned enough space for growing seedlings.
Supplies
- I have clean seed-starting containers.
- Drainage holes are available.
- I have suitable seed-starting mix.
- I have gentle watering equipment.
- I prepared plant labels.
- I have adequate lighting.
- I can monitor temperature when necessary.
Sowing
- I moistened the growing medium appropriately.
- I followed the recommended sowing depth.
- I spaced seeds correctly.
- I labeled every container.
- I watered without disturbing the seeds.
Germination
- I maintain suitable temperatures.
- I check moisture regularly.
- I avoid waterlogged growing media.
- I monitor covered trays for excessive condensation.
- I allow enough time for germination.
Seedling Care
- Seedlings receive sufficient light.
- I adjust grow light position as needed.
- I provide gentle air circulation.
- I thin crowded seedlings when appropriate.
- I watch for signs of damping-off.
- I avoid excessive fertilizer.
- I monitor root development.
Transplanting
- Seedlings are sufficiently established.
- The destination has suitable growing conditions.
- I handle roots carefully.
- I prepare outdoor-bound seedlings through gradual acclimation.
- I continue monitoring after transplanting.
Common Indoor Seed-Starting Problems and Solutions
| Problem | Possible cause | Practical solution |
|---|---|---|
| Seeds do not germinate | Old seeds, unsuitable temperature, moisture, or sowing depth | Check viability and species requirements |
| Germination is uneven | Variable moisture, temperature, or seed quality | Improve consistency and review seed conditions |
| Seedlings become tall and thin | Insufficient light or excessive warmth | Improve lighting and review temperature |
| Seedlings collapse near the soil surface | Possible damping-off disease | Remove affected seedlings and improve sanitation and growing conditions |
| Growing medium develops surface mold | Excess moisture and organic material | Improve moisture management and ventilation |
| Seedlings turn yellow | Nutrient, moisture, light, or root problems | Assess the growing environment before making changes |
| Seedlings stop growing | Root restriction, temperature, light, or nutrition | Review container size and growing conditions |
| Seeds wash out of position | Watering too forcefully | Use gentle watering methods |
| Growing medium dries too quickly | Small containers, heat, or strong airflow | Monitor moisture more frequently |
| Seedlings become overcrowded | Too many seeds in one container | Thin carefully |
| Seedlings wilt after transplanting | Root disturbance or environmental stress | Provide appropriate moisture and protected conditions |
| Leaves scorch outdoors | Insufficient hardening off | Introduce outdoor light gradually |
| Roots become crowded | Seedlings remain too long in small cells | Transplant at an appropriate stage |
| Seedlings grow unevenly | Uneven lighting | Improve light distribution |
| Fungus gnats appear | Persistently moist organic media | Improve moisture management and use suitable pest-control methods |
Most seed-starting problems become easier to manage when growers monitor conditions consistently and respond before problems become severe.
Frequently Asked Questions
1. What are the easiest seeds to start indoors?
Basil, lettuce, tomatoes, marigolds, and several other common vegetables and flowers can be suitable for beginners.
Choose varieties that match your available light, space, and growing conditions.
2. Do I need special equipment to start seeds indoors?
Not necessarily.
Many seeds can be started with clean containers, suitable growing media, water, labels, and adequate light.
Grow lights and temperature-control equipment may improve consistency in some environments.
3. Can I start seeds indoors without grow lights?
Yes, if natural light is sufficiently strong and consistent for the seedlings.
However, many indoor locations do not provide enough light for healthy growth.
Grow lights can be helpful when natural illumination is limited.
4. How deep should I plant seeds?
Sowing depth depends on the species.
Some seeds require surface sowing, while others should be covered with growing medium.
Follow the seed packet’s instructions.
5. How often should I water newly planted seeds?
Check the growing medium regularly and maintain appropriate moisture.
Avoid rigid watering schedules.
The goal is to prevent excessive drying without creating waterlogged conditions.
6. How long does it take seeds to germinate?
Germination time varies widely among species.
Some seeds emerge within days, while others may require several weeks or specialized treatments.
Temperature, moisture, and seed viability influence the process.
7. Should I cover seed trays with plastic?
A humidity dome or suitable cover can help reduce moisture loss during germination.
However, excessive humidity and heat can create problems.
Monitor conditions and remove or ventilate the cover when appropriate.
8. Why are my seedlings growing tall and thin?
Insufficient light is a common cause of leggy growth.
Excessive warmth and overcrowding may also contribute.
Improve lighting and review the growing environment.
9. What are true leaves?
True leaves are the leaves that develop after the initial seed leaves, or cotyledons.
They typically begin to resemble the mature plant’s characteristic foliage.
10. When should I fertilize seedlings?
The appropriate timing depends on the species and growing medium.
Many seedlings begin needing additional nutrients after true leaves develop and active growth begins.
Avoid excessive fertilizer.
11. Can I use ordinary garden soil for starting seeds?
Ordinary garden soil is often less suitable for indoor seed-starting containers because it may compact or contain unwanted organisms.
A quality seed-starting mix generally provides more predictable conditions.
12. What should I do if several seeds sprout in one cell?
If seedlings become overcrowded, thin them according to the species’ requirements.
Cutting unwanted seedlings near the surface may reduce disturbance to neighboring roots.
13. When should I transplant seedlings into larger pots?
Transplant when seedlings have developed sufficient roots and foliage and their current containers are becoming restrictive.
Avoid both extremely early transplanting and severe root crowding.
14. Do seedlings need to be hardened off before going outside?
Most indoor-grown seedlings intended for outdoor planting benefit from gradual acclimation.
This helps them adjust to sunlight, wind, and temperature changes.
15. Can I start seeds indoors all year?
Some seeds can be started indoors throughout the year when suitable light, temperature, space, and growing conditions are available.
However, plants intended for outdoor gardens should be timed according to local seasons and transplanting conditions.
Final Thoughts
Starting seeds indoors is a practical gardening skill that allows beginners to participate in the earliest stages of plant growth.
Although the process involves several important factors, successful seed starting does not need to be complicated.
Choosing suitable seeds, following sowing instructions, using clean containers, providing appropriate growing media, and maintaining consistent moisture can create a strong foundation for germination.
Once seedlings emerge, adequate light, gentle airflow, thoughtful watering, and careful observation become increasingly important.
It is also helpful to remember that not every seed will germinate and not every seedling will develop perfectly. Variations in seed quality, environmental conditions, and species requirements are normal parts of gardening.
Each growing attempt provides an opportunity to understand plant behavior more clearly and improve future results.
With patience, attention, and a willingness to learn, even a small indoor seed-starting setup can become a rewarding source of herbs, vegetables, flowers, and ornamental plants.
Every healthy plant begins with the right conditions for growth. By giving seeds the moisture, warmth, light, and care they need, you can turn a simple container of growing medium into the beginning of a thriving garden.